• Please if you have anything to share with us dont fall back, upload your resources, Questions and solutions for others to benefit too.

FOREX TRADING COMPLETE LESSON

  • Thread starter Thread starter chrismory
  • Start date Start date
  • Replies: Replies Replies 5
  • Views: Views Views 73
Status
Not open for further replies.

chrismory

Administrator
Staff member
Joined
Oct 9, 2025
Messages
38
Forex, short for foreign exchange, is the global marketplace where currencies are traded. Think of it as the world’s biggest financial market bigger than stocks, bigger than bonds with over $7 trillion traded daily.

1. What Forex Really Is​

At its core, Forex trading means buying one currency while selling another. Currencies always move in pairs, like:
  • EUR/USD (Euro vs US Dollar)
  • GBP/JPY (British Pound vs Japanese Yen)
If you believe the Euro will rise against the Dollar, you buy EUR/USD. If you think it’ll fall, you sell it. That’s the entire idea.
Forex = buying one currency and selling another at the same time. You trade pairs. Your job is to predict direction of that pair. Everything else (platforms, orders, risk rules) supports that decision.

Currency prices change all the time because of things like:
  • Economic news (jobs, inflation, etc.)
  • Central banks changing interest rates
  • Political events or big world news
  • How confident traders feel about the market

You make money if you predict the direction right . buy when it’s cheap, sell when it’s high, or the other way around.


Core concepts you must know (no shortcuts)

Currency Pair (Base/Quote)​

Every Forex trade involves two currencies. The first is the base, the second is the quote.
  • EUR/USD 1.1000
    • Base = EUR
    • Quote = USD
    • This means 1 euro costs 1.1000 dollars.
Important point: if the quote goes up, the base is getting stronger relative to the quote. If it goes down, the base is weakening.

Pairs are grouped into:
  • Major pairs – most traded, include USD (EUR/USD, GBP/USD, USD/JPY)
  • Minor pairs – no USD involved (EUR/GBP, EUR/JPY)
  • Exotics – one major + one emerging market currency (USD/TRY, USD/ZAR)


Price Movements & Pips​

A pip is the smallest standardized movement in a pair.
  • Most pairs: 0.0001
  • JPY pairs: 0.01
Example: EUR/USD moves from 1.1000 → 1.1005 → +5 pips.

Why it matters: profits/losses are measured in pips, which are then converted to currency value depending on your lot size.
he Japanese yen (JPY) is quoted with only two decimal places in forex pairs like USD/JPY because its value per unit is much lower than that of most major currencies. For example, one U.S. dollar is worth around 150 yen, compared to about 1.08 euros or 1.27 pounds. To keep price movements meaningful and consistent, a "pip" the smallest standard price change is defined as 0.01 for JPY pairs (e.g., 150.00 to 150.01), rather than 0.0001 as used in EUR/USD or GBP/USD. Using four decimals for JPY would make a single pip far too small (0.0001 JPY), resulting in tiny, impractical changes that don’t align with how traders measure profit, loss, or risk across different currencies. Other low-value currencies follow the same two-decimal convention, including the Hungarian forint (USD/HUF, e.g., 360.50), South African rand (USD/ZAR, e.g., 17.85), and Thai baht (USD/THB, e.g., 33.40), where one pip equals 0.01 due to their small unit values.

This two-decimal convention for JPY and similar currencies is a long-standing market standard rooted in each currency’s relatively low unit value and historical pricing practices. It ensures that a one-pip move carries a reasonable dollar value typically $6–10 per $100,000 traded similar to other major pairs despite the exchange rate difference. While some brokers now display JPY and other two-decimal pairs with three decimals (e.g., 150.123 or 360.505) for extra precision, the official pip remains the second decimal place. In short, the number of decimals isn’t arbitrary it’s designed to maintain clarity, consistency, and practicality in global forex trading, and this logic applies equally to JPY, HUF, ZAR, THB, and other low-unit currencies.


Lot Sizes​

A lot determines the trade size.
  • Standard lot = 100,000 units of base
  • Mini lot = 10,000 units
  • Micro lot = 1,000 units
Example: If EUR/USD moves 1 pip with a standard lot, the value is roughly $10. Mini lot ≈ $1/pip, Micro lot ≈ $0.10/pip.

Knowing lot sizes is crucial because your risk per trade is calculated using pip value × number of pips you’re willing to risk.


Leverage & Margin​

Leverage lets you control large positions with a small deposit.
  • Leverage 1:100 → $1 controls $100
  • Leverage 1:500 → $1 controls $500

Margin is the required deposit to open a position. Example:
  • You want to open 1 standard lot EUR/USD (100,000 EUR)
  • EUR/USD = 1.1000
  • Account in USD, leverage 1:100
  • Margin = 100,000 × 1.1000 ÷ 100 = $1,100

Important: High leverage magnifies profits and losses. One wrong move with high leverage can blow up an account fast.


Spread​

Spread = broker’s cost. It’s the difference between bid (sell) and ask (buy) prices.
  • EUR/USD: Bid = 1.1000, Ask = 1.1002 → spread = 2 pips
  • You start a trade slightly in negative, since the pair must move enough to cover the spread.


Order Types​

Forex offers flexibility to enter/exit positions.
  1. Market Order – buy/sell immediately at current price
  2. Limit Order – buy below current price, sell above current price
  3. Stop Order – buy above current price, sell below current price (used for breakout trading)
  4. Stop-Loss (SL) – automatically closes a losing trade to limit risk
  5. Take-Profit (TP) – automatically closes a winning trade at target

Key tip: always plan SL and TP before entering a trade. This is risk management 101.


Going Long vs Short​

  • Long (buy): expect price to rise
  • Short (sell): expect price to fall
Example: EUR/USD = 1.1000
  • Buy → price rises to 1.1050 → profit
  • Sell → price falls to 1.0950 → profit

Important concept: in Forex, you can profit from falling markets. You don’t need to “own” the currency; you’re trading price movements.


Additional Core Concepts​

  1. Volatility
    Measures how fast a pair moves. High volatility = big swings, more opportunities but more risk.
  2. Liquidity
    How easy it is to buy/sell a currency without affecting the price. Major pairs = highly liquid, exotics = low liquidity.
  3. Swap/Overnight Interest
    If you hold a position overnight, you may pay or earn interest due to different currency rates.
  4. Risk/Reward Ratio
    • Decide before trade: “I’m risking 50 pips to make 100 pips → 1:2 ratio”
    • Helps protect your account from blowing up
  5. Correlation
    Some pairs move together (EUR/USD & GBP/USD), some opposite (USD/CHF vs EUR/USD). Awareness helps in risk management.


Here’s what this really means: mastering Forex is not just about knowing the definitions, it’s about how these elements interact. Leverage without understanding pips and margin is dangerous. Spreads eat profits if ignored. Risk management is the only way to survive long term.

Why Currencies Move
1. Economic Indicators

Strong economic data usually strengthens a currency; weak data weakens it.
  • GDP growth
  • Inflation (CPI, PPI)
  • Employment data (e.g., Non-Farm Payrolls in the US)
  • Retail sales
  • Industrial production
  • Trade balance (exports vs. imports)

2. Interest Rates & Central Bank Policy
Higher interest rates attract foreign investment → currency appreciates.
  • Decisions by central banks like:
    • Federal Reserve (Fed) – USD
    • European Central Bank (ECB) – EUR
    • Bank of Japan (BOJ) – JPY
    • Bank of England (BOE) – GBP
  • Forward guidance and rate hike/cut expectations move markets even before decisions.

3. Inflation Expectations
  • High inflation → pressure to raise rates → stronger currency
  • Low or deflation → possible rate cuts → weaker currency

4. Political Stability & Geopolitical Events
  • Elections, government changes, trade wars, sanctions, or conflicts can cause sudden volatility.
  • Example: Brexit → GBP plunged due to uncertainty.

5. Market Sentiment & Risk Appetite
  • Risk-on: Investors favor high-yield currencies (AUD, NZD, emerging markets)
  • Risk-off: Flight to safe-haven currencies (USD, JPY, CHF)

6. Speculation & Trader Positioning
  • Large hedge funds, banks, and retail traders betting on trends.
  • Carry trades: Borrowing in low-yield currencies (e.g., JPY) to invest in high-yield ones (e.g., AUD).

7. Supply and Demand for Currencies
  • Trade flows: Countries exporting more earn foreign currency → demand rises.
  • Capital flows: Foreign direct investment (FDI), portfolio investments.

8. Commodity Prices (for commodity-linked currencies)
  • Oil → CAD (Canada), NOK (Norway), RUB (Russia)
  • Gold → AUD (Australia)
  • Agricultural goods → NZD (New Zealand)

9. Technical Factors
  • Chart patterns, support/resistance levels, moving averages.
  • Algorithmic and high-frequency trading amplify moves.

10. Unexpected Events (Black Swans)
  • Natural disasters, terrorist attacks, pandemics (e.g., COVID-19 caused massive USD strength initially).

Summary: The Forex Market Never Sleeps

The forex market operates 24/5, with overlapping sessions (Asia, Europe, North America). Prices react instantly to:
  • News releases
  • Central bank speeches
  • Economic data surprises
  • Global risk events
Pro Tip: The US Dollar (USD) is involved in ~88% of all forex trades, so US economic data and Fed policy often drive the entire market.


When and Where Forex Happens
Forex doesn’t have a single building or market like the stock exchange. It happens online, between people, banks, and companies all over the world. You just need an internet connection and a trading platform that’s your access to the market.
When it Happens
Forex is open 24 hours a day, five days a week. It starts on Monday morning in Asia and keeps moving around the world until Friday night in the U.S.
Think of it like a relay race when one region finishes trading, another one starts. That’s why the market almost never sleeps.
Here’s how it moves through time zones:
Trading SessionOpens (UTC)Closes (UTC)Opens (EAT – Dar es Salaam)Closes (EAT – Dar es Salaam)What Happens
Sydney (Australia)10 PM7 AM1 AM10 AMMarket wakes up – light movement
Tokyo (Asia)12 AM9 AM3 AM12 PMAsian currencies (JPY) get active
London (Europe)8 AM5 PM11 AM8 PMBiggest session – lots of volume
New York (USA)1 PM10 PM4 PM1 AMUSD pairs move strongly
The busiest time is when London and New York sessions overlap around 4 PM to 8 PM EAT. That’s when prices move the most, and traders find the best opportunities.
Where it Happens
There’s no single location. Forex trading happens:
  • On your computer or phone
  • Through brokers who connect you to the global market
  • Between traders all around the world
So in short:
Forex happens everywhere, and it’s open almost all day, except weekends.


How Forex Trading Actually Works
At its core, forex trading is buying one currency and selling another at the same time because currencies are always traded in pairs.
For example:
When you trade EUR/USD, you’re comparing the Euro against the US Dollar.
  • If you think the Euro will rise against the Dollar, you buy EUR/USD.
  • If you think the Euro will fall, you sell EUR/USD.
When your prediction is right, you make a profit. If it’s wrong, you lose.


Who’s Involved in Forex
  1. Big Banks and Institutions – They move most of the money.
  2. Companies – They trade currencies for business (like paying suppliers overseas).
  3. Governments and Central Banks – They stabilize their currency or control inflation.
  4. Retail Traders – People like you and me, trading through online brokers.
Everyone is connected electronically. You never “see” your buyer or seller your broker handles that part.


How You Make Money
Let’s say:
  • You buy EUR/USD at 1.1000
  • Later, the price rises to 1.1050
That’s a difference of 50 pips (a “pip” is the smallest price movement in forex).

If your position size is $10 per pip, you made $500 (50 × $10).
If it went the other way, you’d lose $500.

The Trading Platform​

A trading platform is the software you use to see prices, read charts, and open or close trades. Think of it as your control room for trading Forex.
Most traders use MetaTrader 4 (MT4) or MetaTrader 5 (MT5) they’re free, popular, and work on phones, laptops, or browsers. Your broker usually gives you a download link when you open an account.


What You See on the Platform​

When you open MT4 or MT5, you’ll see a few main parts:
1. Chart Window
This shows how a currency’s price moves over time. Each “candle” or “bar” represents a time period could be one minute, one hour, or one day, depending on your setting.
You use charts to spot trends and decide when to buy or sell.


2. Market Watch
This small list shows currency pairs and their current prices.
Example:
  • EUR/USD – 1.1002 / 1.1004
  • GBP/USD – 1.2731 / 1.2733

The first number is the sell price (bid), and the second is the buy price (ask). The tiny difference between them is the spread that’s your broker’s small fee.


3. Terminal or Trade Tab
Here you see your open trades, account balance, profit/loss, and trade history. It’s basically your dashboard.

4. Order Panel
This is where you place new trades. You’ll choose the pair, trade size, whether you want to buy or sell, and set your Stop Loss (SL) and Take Profit (TP) levels before confirming.


Placing a Simple Trade​

Let’s say you want to buy EUR/USD.
  1. Open the Order Window.
  2. Choose EUR/USD.
  3. Type your lot size (example: 0.01 = micro lot).
  4. Click Buy by Market if you want to buy immediately at the current price.
  5. Set your Stop Loss (to limit loss) and Take Profit (to secure profit).

That’s it. You’ve opened your first trade. You can close it anytime manually or let the platform close it automatically when it hits your SL or TP.


Timeframes​

You can view charts in different timeframes:
  • M1 = 1 minute
  • M15 = 15 minutes
  • H1 = 1 hour
  • H4 = 4 hours
  • D1 = 1 day

Shorter timeframes show quick price moves. Longer ones show the bigger picture. Most beginners start with H1 or H4 it’s calmer and clearer.


Indicators​

These are tools that help you read charts. Examples:
  • Moving Average (MA) – shows the general trend.
  • Relative Strength Index (RSI) – shows when the market might be overbought or oversold.
  • MACD – shows momentum and possible reversals.
Use indicators to confirm your decisions, not to replace thinking. Too many indicators = confusion.
YOU CAN USE TRADING VIEW SOFTWARE FOR BETTER VIEW DOWNLOAD TRADING VIEW


Practice on Demo​

Your demo account lets you use the platform with fake money.
Use it to learn:
  • How to open and close trades
  • How to set SL and TP
  • How to read charts and change timeframes
  • How to test your strategy without risk

Stay on demo until you feel comfortable using every part of the platform with your eyes closed.
 

Cash Flow in Forex Trading​

When a trader opens or closes a position, their account is credited or debited based on the notional value of the trade. The notional value is the size of the trade multiplied by the exchange rate, representing the nominal value of the position. Importantly, traders rarely see the full notional amount moving; instead, they track profit and loss, which is the real reflection of cash flow from trading.

Example: EUR/USD Trade​

Mike wants to buy 1 standard lot of EUR/USD (100,000 euros) at 1.2350. To buy euros, he sells US dollars equivalent to the trade size:
  • Buy (Open Position): 100,000 EUR × 1.2350 USD/EUR = 123,500 USD debited from his account.

Later, EUR/USD rises to 1.2512. Mike decides to close the position by selling the same 100,000 euros:
  • Sell (Close Position): 100,000 EUR × 1.2512 USD/EUR = 125,120 USD credited to his account.

Trade Profit: 125,120 − 123,500 = 1,620 USD

Here’s what happens:
  • When the position opens, the account is debited the required quote currency to purchase the base currency.
  • When the position closes, the account is credited with the proceeds from selling the base currency.
  • The difference between these amounts is the profit or loss.

This illustrates how Forex cash flow works. The account never physically moves millions of dollars; the platform calculates gains/losses based on the notional amount, reflecting the effective change in market value.


Notional Amounts​

In retail Forex trading, most trades are not for physical delivery. Instead, positions are expressed in notional amounts—the nominal value used to calculate gains or losses.


  • Example: Buying 1 standard lot of EUR/USD = 100,000 EUR notional.
  • You don’t physically exchange $123,500; the platform tracks profits and losses based on the price movements of this notional amount.


Margin and Leverage​


Because daily price movements in major currency pairs are relatively small, brokers offer leverage to allow traders to control large positions with a smaller capital outlay.
  • Leverage: The ratio of the position size to the margin required.
  • Margin: The collateral needed to open and maintain a leveraged position.

Example: USD/JPY Trade​

Mary deposits 10,000 USD in her Forex account. She expects the USD to rise against JPY and buys 1 standard lot (USD 100,000) at 79.50.


  • With 50:1 leverage, Mary only needs to post 2,000 USD as margin.
  • The remaining 8,000 USD in her account is free to open additional positions.

Trade Outcome​

USD/JPY rises from 79.50 → 80.00. Mary closes the position:
  • Notional JPY received: 100,000 USD × 80.00 = 8,000,000 JPY
  • Notional JPY paid: 100,000 USD × 79.50 = 7,950,000 JPY
  • Profit in JPY: 50,000 JPY

Convert profit to USD at the closing rate:

Screenshot 2025-11-03 220613.png
This demonstrates the power of leverage: a small margin controls a large position, amplifying both profits and losses.


Risk Note​


If the market had moved against Mary by 50 points (from 79.50 → 79.00), she would have lost 632.91 USD, more than 30% of her margin. High leverage magnifies risk, making proper risk management essential.


Key Takeaways​

  1. Cash flows in Forex are mostly notional; traders see P/L changes rather than full transaction amounts.
  2. Leverage amplifies both gains and losses; understanding margin requirements is crucial.
  3. Notional value vs. margin: You can control a large position with a fraction of capital.
  4. Conversion between currencies affects profit when trading cross-currency pairs.

Predicting Price Movement in Forex: Key Factors

  1. Trend Analysis
    Understanding the dominant market direction in your chosen timeframe.
  2. Support and Resistance Levels
    Identifying key price areas where buyers or sellers are likely to act.
  3. Candlestick Patterns
    Reading price action to spot potential reversals or continuations.
  4. Technical Indicators
    Using tools like RSI, MACD, and Moving Averages to confirm signals.
  5. Volume and Liquidity
    Assessing market participation to gauge the strength of a move.
  6. Timeframe Context / Multi-Timeframe Analysis
    Aligning signals across higher and lower timeframes for reliability.
  7. Fundamental Factors / News Events
    Considering economic data, central bank decisions, and geopolitical events.
  8. Market Sentiment
    Gauging trader positioning and crowd behavior for potential contrarian signals.
  9. Risk Management Considerations
    Always factoring in stop-loss levels, position sizing, and potential loss.

Trend Analysis: The Core of Predicting Price Direction​

1. What is a Trend?​

A trend is the general direction in which a market moves over a period of time. In Forex, trends are not just random ups and downs—they are caused by the balance of supply (sellers) and demand (buyers) over time.

Types of Trends:

  1. Uptrend (Bullish)
    • Price makes higher highs (HH) and higher lows (HL).
    • Indicates buyers are in control.
  2. Downtrend (Bearish)
    • Price makes lower highs (LH) and lower lows (LL).
    • Indicates sellers are in control.
  3. Sideways / Range-Bound
    • Price oscillates between horizontal support and resistance.
    • Neither buyers nor sellers dominate.


2. Why Trends Matter​


Here’s the key: “The trend is your friend.”

  • Predicting price movement is easier when you trade with the trend.
  • Going against a strong trend is riskier because momentum favors the dominant side.
  • Trend strength gives clues about how far the price might move in your timeframe.


3. How to Identify a Trend​

a) Price Action (Visual Analysis)​

  • Look for higher highs and higher lows → uptrend.
  • Look for lower highs and lower lows → downtrend.
  • Example (4H chart):
    • If each successive 4-hour candle closes higher than the previous swing low, the uptrend is intact.

b) Trendlines​

  • Draw a line connecting successive lows in an uptrend or successive highs in a downtrend.
  • A trendline break can indicate a trend reversal or weakening.

c) Moving Averages (MA)​

  • Simple Moving Average (SMA) or Exponential Moving Average (EMA) can smooth out price noise.
  • Common methods:
    • Price above a rising 50-period MA → bullish
    • Price below a falling 50-period MA → bearish
    • MA Crossovers: Short-term MA crossing above long-term MA → potential uptrend start, and vice versa.

d) Trend Strength Indicators​

  • ADX (Average Directional Index): Measures trend strength (not direction).
    • ADX > 25 → strong trend
    • ADX < 20 → weak or no trend
  • Momentum indicators: RSI or MACD can confirm that the trend has force behind it.


4. Trend Reversals vs Continuations​

Reversal Signals:​

  • Higher timeframe resistance broken with weak momentum → possible reversal.
  • Double tops/bottoms, head & shoulders patterns at trend extremes.
  • Candlestick patterns: Doji, Hammer, Shooting Star.

Continuation Signals:​

  • Pullbacks to trendline or moving average followed by continuation.
  • Price bouncing off support/resistance aligned with trend.


5. Multi-Timeframe Trend Analysis​

  • Always check higher timeframe trend first: Daily (1D) or Weekly.
  • Then analyze your trading timeframe (4H, 1H) for entries:
    • Example: Daily chart uptrend → look for 4H pullbacks to enter long.
  • This alignment increases probability: trading with both short-term and long-term trend is much safer than trading against it.


6. Practical Steps to Use Trend for Prediction​

  1. Identify the overall trend on your trading timeframe.
  2. Confirm trend with trendlines, moving averages, and ADX.
  3. Look for pullbacks or consolidations as potential entry points.
  4. Use support/resistance levels to gauge possible targets.
  5. Confirm with candlestick patterns or momentum indicators before entering.


Here’s the key insight: Trend analysis doesn’t tell you exact price, it tells you the probability of direction. Once you know the trend, all your other tools (candlesticks, indicators, support/resistance) become signals within that trend rather than random guesses.


Support and Resistance: Predicting Price Reactions

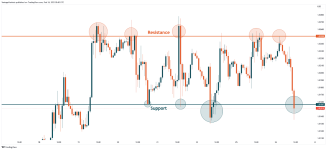
1762198105364.png

1. What Are Support and Resistance?​

  • Support: A price level where buyers historically step in, stopping the price from falling further. Think of it as a “floor.”
  • Resistance: A price level where sellers historically step in, stopping the price from rising further. Think of it as a “ceiling.”
Why it matters: Price often reacts at these levels. They help you predict potential bounces, breakouts, or reversals.


2. How to Identify Key Levels​

a) Horizontal Levels​

  • Look at previous swing highs and lows.
  • These often act as natural support/resistance in the future.
  • Example: EUR/USD had a swing high at 1.2500 → next time price approaches 1.2500, sellers may step in.

b) Trendline Support/Resistance​

  • Connect higher lows in an uptrend → trendline acts as support.
  • Connect lower highs in a downtrend → trendline acts as resistance.
  • Trendlines are dynamic levels that move with the trend, unlike horizontal levels.

c) Moving Averages as Dynamic Support/Resistance​

  • Popular: 50-period, 100-period, 200-period MAs.
  • Price often reacts when it touches these MAs during trending markets.
  • Example: Price in an uptrend pulls back to 50 EMA → potential buying opportunity.

d) Psychological Levels​

  • Round numbers (e.g., 1.2000, 1.3000) often act as support or resistance because traders place orders around them.


3. Types of Reactions at Support/Resistance​

  1. Bounce / Reversal:
    • Price hits the level and reverses in the opposite direction.
    • Often accompanied by candlestick patterns: Hammer, Shooting Star, Engulfing.
  2. Breakout:
    • Price breaks through a level with strong momentum.
    • Often signals trend continuation if aligned with overall trend.
    • Watch for volume confirmation: higher volume → stronger breakout.
  3. False Break / Fakeout:
    • Price briefly breaks a level but reverses back.
    • Can trap traders; combining candlesticks, trend context, and indicators reduces risk.


4. Using Support/Resistance to Predict Price Moves​

  1. Align with Trend:
    • Uptrend → support levels are potential buy zones.
    • Downtrend → resistance levels are potential sell zones.
  2. Wait for Confirmation:
    • Candlestick pattern at the level
    • Momentum indicator showing strength or reversal (RSI, MACD)
    • Volume confirming reaction
  3. Set Targets and Stops:
    • Buy near support → stop slightly below it
    • Sell near resistance → stop slightly above it
    • Helps manage risk while taking advantage of likely reactions


5. Multi-Timeframe Support/Resistance​

  • Check higher timeframe levels first—they are stronger and more reliable.
  • Example: Daily chart shows support at 1.2450, 4H chart shows a minor swing low at 1.2470.
    • Entering long near 1.2470 gives good timing, but the strong support at 1.2450 provides a safety net.


Key Takeaways​

  • Support/resistance doesn’t tell you exact price, but tells you where price is likely to react.
  • Combining with trend analysis and candlesticks increases predictive power.
  • Watching how price behaves around these levels is crucial for timing entries and exits.
 

Cash Flow in Forex Trading​

When a trader opens or closes a position, their account is credited or debited based on the notional value of the trade. The notional value is the size of the trade multiplied by the exchange rate, representing the nominal value of the position. Importantly, traders rarely see the full notional amount moving; instead, they track profit and loss, which is the real reflection of cash flow from trading.

Example: EUR/USD Trade​

Mike wants to buy 1 standard lot of EUR/USD (100,000 euros) at 1.2350. To buy euros, he sells US dollars equivalent to the trade size:
  • Buy (Open Position): 100,000 EUR × 1.2350 USD/EUR = 123,500 USD debited from his account.

Later, EUR/USD rises to 1.2512. Mike decides to close the position by selling the same 100,000 euros:
  • Sell (Close Position): 100,000 EUR × 1.2512 USD/EUR = 125,120 USD credited to his account.

Trade Profit: 125,120 − 123,500 = 1,620 USD

Here’s what happens:
  • When the position opens, the account is debited the required quote currency to purchase the base currency.
  • When the position closes, the account is credited with the proceeds from selling the base currency.
  • The difference between these amounts is the profit or loss.

This illustrates how Forex cash flow works. The account never physically moves millions of dollars; the platform calculates gains/losses based on the notional amount, reflecting the effective change in market value.


Notional Amounts​

In retail Forex trading, most trades are not for physical delivery. Instead, positions are expressed in notional amounts—the nominal value used to calculate gains or losses.


  • Example: Buying 1 standard lot of EUR/USD = 100,000 EUR notional.
  • You don’t physically exchange $123,500; the platform tracks profits and losses based on the price movements of this notional amount.


Margin and Leverage​


Because daily price movements in major currency pairs are relatively small, brokers offer leverage to allow traders to control large positions with a smaller capital outlay.
  • Leverage: The ratio of the position size to the margin required.
  • Margin: The collateral needed to open and maintain a leveraged position.

Example: USD/JPY Trade​

Mary deposits 10,000 USD in her Forex account. She expects the USD to rise against JPY and buys 1 standard lot (USD 100,000) at 79.50.


  • With 50:1 leverage, Mary only needs to post 2,000 USD as margin.
  • The remaining 8,000 USD in her account is free to open additional positions.

Trade Outcome​

USD/JPY rises from 79.50 → 80.00. Mary closes the position:
  • Notional JPY received: 100,000 USD × 80.00 = 8,000,000 JPY
  • Notional JPY paid: 100,000 USD × 79.50 = 7,950,000 JPY
  • Profit in JPY: 50,000 JPY

Convert profit to USD at the closing rate:

Screenshot 2025-11-03 220613.png
This demonstrates the power of leverage: a small margin controls a large position, amplifying both profits and losses.


Risk Note​


If the market had moved against Mary by 50 points (from 79.50 → 79.00), she would have lost 632.91 USD, more than 30% of her margin. High leverage magnifies risk, making proper risk management essential.


Key Takeaways​

  1. Cash flows in Forex are mostly notional; traders see P/L changes rather than full transaction amounts.
  2. Leverage amplifies both gains and losses; understanding margin requirements is crucial.
  3. Notional value vs. margin: You can control a large position with a fraction of capital.
  4. Conversion between currencies affects profit when trading cross-currency pairs.

Predicting Price Movement in Forex: Key Factors

  1. Trend Analysis
    Understanding the dominant market direction in your chosen timeframe.
  2. Support and Resistance Levels
    Identifying key price areas where buyers or sellers are likely to act.
  3. Candlestick Patterns
    Reading price action to spot potential reversals or continuations.
  4. Technical Indicators
    Using tools like RSI, MACD, and Moving Averages to confirm signals.
  5. Volume and Liquidity
    Assessing market participation to gauge the strength of a move.
  6. Timeframe Context / Multi-Timeframe Analysis
    Aligning signals across higher and lower timeframes for reliability.
  7. Fundamental Factors / News Events
    Considering economic data, central bank decisions, and geopolitical events.
  8. Market Sentiment
    Gauging trader positioning and crowd behavior for potential contrarian signals.
  9. Risk Management Considerations
    Always factoring in stop-loss levels, position sizing, and potential loss.

Trend Analysis: The Core of Predicting Price Direction​

1. What is a Trend?​

A trend is the general direction in which a market moves over a period of time. In Forex, trends are not just random ups and downs—they are caused by the balance of supply (sellers) and demand (buyers) over time.

Types of Trends:

  1. Uptrend (Bullish)
    • Price makes higher highs (HH) and higher lows (HL).
    • Indicates buyers are in control.
  2. Downtrend (Bearish)
    • Price makes lower highs (LH) and lower lows (LL).
    • Indicates sellers are in control.
  3. Sideways / Range-Bound
    • Price oscillates between horizontal support and resistance.
    • Neither buyers nor sellers dominate.


2. Why Trends Matter​


Here’s the key: “The trend is your friend.”

  • Predicting price movement is easier when you trade with the trend.
  • Going against a strong trend is riskier because momentum favors the dominant side.
  • Trend strength gives clues about how far the price might move in your timeframe.


3. How to Identify a Trend​

a) Price Action (Visual Analysis)​

  • Look for higher highs and higher lows → uptrend.
  • Look for lower highs and lower lows → downtrend.
  • Example (4H chart):
    • If each successive 4-hour candle closes higher than the previous swing low, the uptrend is intact.

b) Trendlines​

  • Draw a line connecting successive lows in an uptrend or successive highs in a downtrend.
  • A trendline break can indicate a trend reversal or weakening.

c) Moving Averages (MA)​

  • Simple Moving Average (SMA) or Exponential Moving Average (EMA) can smooth out price noise.
  • Common methods:
    • Price above a rising 50-period MA → bullish
    • Price below a falling 50-period MA → bearish
    • MA Crossovers: Short-term MA crossing above long-term MA → potential uptrend start, and vice versa.

d) Trend Strength Indicators​

  • ADX (Average Directional Index):Measures trend strength (not direction).
    • ADX > 25 → strong trend
    • ADX < 20 → weak or no trend
  • Momentum indicators: RSI or MACD can confirm that the trend has force behind it.


4. Trend Reversals vs Continuations​

Reversal Signals:​

  • Higher timeframe resistance broken with weak momentum → possible reversal.
  • Double tops/bottoms, head & shoulders patterns at trend extremes.
  • Candlestick patterns: Doji, Hammer, Shooting Star.

Continuation Signals:​

  • Pullbacks to trendline or moving average followed by continuation.
  • Price bouncing off support/resistance aligned with trend.


5. Multi-Timeframe Trend Analysis​

  • Always check higher timeframe trend first: Daily (1D) or Weekly.
  • Then analyze your trading timeframe (4H, 1H) for entries:
    • Example: Daily chart uptrend → look for 4H pullbacks to enter long.
  • This alignment increases probability: trading with both short-term and long-term trend is much safer than trading against it.


6. Practical Steps to Use Trend for Prediction​

  1. Identify the overall trend on your trading timeframe.
  2. Confirm trend with trendlines, moving averages, and ADX.
  3. Look for pullbacks or consolidations as potential entry points.
  4. Use support/resistance levels to gauge possible targets.
  5. Confirm with candlestick patterns or momentum indicators before entering.


Here’s the key insight: Trend analysis doesn’t tell you exact price, it tells you the probability of direction. Once you know the trend, all your other tools (candlesticks, indicators, support/resistance) become signals within that trend rather than random guesses.


Support and Resistance: Predicting Price Reactions

unnamed.png

1. What Are Support and Resistance?​

  • Support: A price level where buyers historically step in, stopping the price from falling further. Think of it as a “floor.”
  • Resistance: A price level where sellers historically step in, stopping the price from rising further. Think of it as a “ceiling.”
Why it matters: Price often reacts at these levels. They help you predict potential bounces, breakouts, or reversals.


2. How to Identify Key Levels​

a) Horizontal Levels​

  • Look at previous swing highs and lows.
  • These often act as natural support/resistance in the future.
  • Example: EUR/USD had a swing high at 1.2500 → next time price approaches 1.2500, sellers may step in.

b) Trendline Support/Resistance​

  • Connect higher lows in an uptrend → trendline acts as support.
  • Connect lower highs in a downtrend → trendline acts as resistance.
  • Trendlines are dynamic levels that move with the trend, unlike horizontal levels.

c) Moving Averages as Dynamic Support/Resistance​

  • Popular: 50-period, 100-period, 200-period MAs.
  • Price often reacts when it touches these MAs during trending markets.
  • Example: Price in an uptrend pulls back to 50 EMA → potential buying opportunity.

d) Psychological Levels​

  • Round numbers (e.g., 1.2000, 1.3000) often act as support or resistance because traders place orders around them.


3. Types of Reactions at Support/Resistance​

  1. Bounce / Reversal:
    • Price hits the level and reverses in the opposite direction.
    • Often accompanied by candlestick patterns: Hammer, Shooting Star, Engulfing.
  2. Breakout:
    • Price breaks through a level with strong momentum.
    • Often signals trend continuation if aligned with overall trend.
    • Watch for volume confirmation: higher volume → stronger breakout.
  3. False Break / Fakeout:
    • Price briefly breaks a level but reverses back.
    • Can trap traders; combining candlesticks, trend context, and indicators reduces risk.


4. Using Support/Resistance to Predict Price Moves​

  1. Align with Trend:
    • Uptrend → support levels are potential buy zones.
    • Downtrend → resistance levels are potential sell zones.
  2. Wait for Confirmation:
    • Candlestick pattern at the level
    • Momentum indicator showing strength or reversal (RSI, MACD)
    • Volume confirming reaction
  3. Set Targets and Stops:
    • Buy near support → stop slightly below it
    • Sell near resistance → stop slightly above it
    • Helps manage risk while taking advantage of likely reactions


5. Multi-Timeframe Support/Resistance​

  • Check higher timeframe levels first—they are stronger and more reliable.
  • Example: Daily chart shows support at 1.2450, 4H chart shows a minor swing low at 1.2470.
    • Entering long near 1.2470 gives good timing, but the strong support at 1.2450 provides a safety net.


Key Takeaways​

  • Support/resistance doesn’t tell you exact price, but tells you where price is likely to react.
  • Combining with trend analysis and candlesticks increases predictive power.
  • Watching how price behaves around these levels is crucial for timing entries and exits.


Candlestick Analysis: Reading Price Psychology Like a Pro

Candlesticks are not just shapes they’re a visual record of buyers vs sellers in a specific time frame (1H, 4H, 1D, etc). Every candle tells a story of who won, who lost, and what’s likely to happen next.


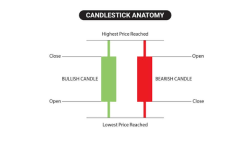
1. Structure of a Candle​

1762240938998.png
Each candle has 4 data points:
  • Open: Where price started.
  • Close: Where it ended.
  • High: The highest point reached.
  • Low: The lowest point reached.

If the close > open, it’s a bullish candle (buyers won).
If the close < open, it’s a bearish candle (sellers won).

The wick (shadow) shows rejection a sign that price tried to move in that direction but was pushed back.
Long wick = strong rejection.


2. Why Candles Matter​

Candles show you real-time shifts in power between buyers and sellers.
If you learn to read them in context (with support/resistance + trend), you can often predict the next few candles before they form.


3. Key Candlestick Patterns That Predict Moves​

Let’s break them into three types: Reversal, Continuation, and Indecision.


A. Reversal Candles — When Price is About to Turn​

These show a change in control between buyers and sellers.

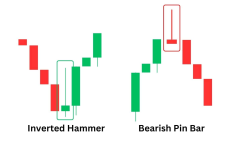
1. Hammer / Inverted Hammer​

1762241177627.png
  • What each candle looks like
    • Hammer: small body near the top of the candle, long lower wick (tail) at least twice the body length, little or no upper wick. Body can be bullish or bearish.
    • Inverted hammer: small body near the bottom, long upper wick (shadow) at least twice the body, little or no lower wick.
  • What the candle represents — the psychology
    • A hammer forms after sellers push price lower during the period, but buyers step in hard and push price back up near the open. That long lower wick shows rejection of lower prices. It suggests buyers may be gaining control.
    • An inverted hammer also shows rejection, but at the top: buyers tried to push price higher, sellers pushed it back, yet the test of higher prices signals buyers exist. In the context of a downtrend, an inverted hammer can be a bullish reversal sign.
  • Here’s the thing: a single candle is not a prophecy. It’s a clue. The market told a story for that timeframe — rejection of one side but you need context and confirmation to act.


    Where the candle matters most (location and context)
    • After a clear downtrend: a hammer or inverted hammer is more meaningful. It can signal a potential bottom/reversal.
    • At support zones or trendline support: signal strength increases when the hammer forms at a known horizontal support, moving-average support, or the lower edge of a channel.
    • In the middle of a range or without volume: the signal is weak; expect false moves.

  • Confirmation — when to trust it
    Wait for confirmation. Options, ordered by safety:
    1. Close confirmation: next candle closes above the hammer’s high (bullish confirmation). For inverted hammer, the next candle should also close above the inverted hammer’s high.
    2. Strong follow-through candle: a bullish engulfing or large green candle after the hammer is a strong sign.
    3. Volume: higher volume on the hammer and on the confirming candle increases probability.
    4. Higher timeframe agreement: if the daily chart shows the same support/rejection area as the 1H hammer, the signal is more reliable.

  • Without confirmation you’re gambling on a weak signal.
    Entry, stop, target — concrete rules
    Conservative (recommended for beginners)
    • Entry: place a buy stop a few pips above the high of the hammer (or inverted hammer) and wait for the order to trigger.
    • Stop loss: place below the low of the hammer, plus a few pips for buffer.
    • Take profit: target the next logical resistance level, recent swing high, or use a reward:risk of at least 1.5:1 (prefer 2:1).
    • Example blueprint: price forms hammer at 1.1000 low; hammer high = 1.1020. Place buy stop at 1.1025, SL at 1.0990, risk = 35 pips; TP at 1.1090 for ~2:1.

  • Aggressive (higher probability of false signals)
    • Entry: buy at market right after hammer candle closes.
    • Stop loss: same as above.
    • Trade only with strict SL and small position size.
  • Position sizing — tie the trade to your risk rules
    • Decide the dollar amount you risk (example: 1% of account).
    • Measure stop-loss distance in pips.
    • Use the pip-value formula or a position-size calculator to determine lot size so that (stop-loss pips × pip value × lots) = your chosen risk amount.

  • How timeframes affect reliability
    • Higher timeframes (daily, 4H): hammers carry more weight and produce more reliable moves.
    • Lower timeframes (M15, M5): more noise, more false signals. Use only if you’re scalping and understand micro structure.

  • What weak/false hammers look like
    • Very long wick caused by one-off news spike with no follow-through.
    • Candle forms far from support or in the middle of a trend without other confirming signs.
    • No volume on the hammer and no follow-up candle.
    • Multiple lower wicks forming in a row with no upward follow-through (selling pressure remains).

  • Improve probability with confluence
    Combine the hammer signal with at least one of:
    • Horizontal support (previous swing low)
    • Trendline or channel support
    • Moving average support (e.g., 50 or 200 EMA)
    • Divergence on RSI/MACD (price makes lower low, RSI makes higher low)
    • Economic events avoided — don’t trust single-candle reversals around major news.

  • Checklist to use before taking a hammer trade
    • Is the hammer at/near support or after a clear downtrend?
    • Does the next candle confirm by closing above the hammer high?
    • Is volume higher on the hammer or confirmation candle?
    • Does a higher timeframe show support or reversal signs?
    • Is reward:risk at least 1.5:1 given realistic TP?
    • Position size calculated so you risk only your preset percent of the account.

  • Quick trade example (numbers to follow the logic)
    • Account = $5,000. Risk per trade = 1% = $50.
    • Hammer low at 1.3000, hammer high 1.3020. You place entry at 1.3025 and stop at 1.2985 → stop distance = 40 pips.
    • Pip value per standard lot on this pair = $10. For micro lots, it’s $0.10 per pip.
    • Required lots = Risk / (stop pips × pip value per lot). If you use mini lots where pip value = $1 per pip: lots = 50 / (40 × 1) = 1.25 mini lots = 0.125 standard lots. Adjust to broker increments.

  • Final practical note
    Candles give high-utility clues about human behavior in the market: who tried to push price where, and who won that battle during the candle’s period. Use hammers and inverted hammers as part of a rule-based plan, not as a gut feeling. The patterns are useful, but only with context, confirmation, and sensible risk management.


2. Shooting Star / Hanging Man

1762249860818.png
Shooting Star

What it looks like:
  • Small body near the bottom of the candle
  • Long upper wick at least twice the body length
  • Little or no lower wick
  • Can be red or green, but red often carries more weight
  • After a clear uptrend, especially near a resistance level
  • On higher timeframes (4H, Daily, Weekly) for more reliability
  • At psychological levels (like 1.2000, 150.00, etc.)

Hammer / Inverted Hammer and Shooting Star / Hanging Man

The Key Difference​

All four are reversal candles.
They look similar — small bodies with long wicks — but the location in the trend decides their meaning.
Hammer / Inverted Hammer and Shooting Star / Hanging Man

Candle Type
Shape
Appears During
Meaning
Likely Direction
HammerSmall body on top, long lower wickDowntrend (bottom)Buyers rejected lower prices, possible reversal upBullish (price may rise)
Inverted HammerSmall body at bottom, long upper wickDowntrend (bottom)Buyers tested upside, sellers pushed back, but buying interest appearedBullish (price may rise)
Shooting StarSmall body at bottom, long upper wickUptrend (top)Buyers pushed high but failed, sellers rejected those higher pricesBearish (price may fall)
Hanging ManSmall body on top, long lower wickUptrend (top)Sellers showed up in an uptrend, testing weakness in buyersBearish (price may fall)

Think of it Like This​

  • Hammer Family (Hammer + Inverted Hammer): appear after a fall, showing buyers are fighting back.
  • Shooting Star Family (Shooting Star + Hanging Man): appear after a rise, showing sellers are pushing back.
The candles themselves can look almost identical — that’s why trend context is everything.


Visual Mindset Trick​

Imagine the wick as the “battle zone.”
  • If the wick is below the body → sellers tried to push it down but lost → bullish sign.
  • If the wick is above the body → buyers tried to push it up but failed → bearish sign.
So:

  • Long lower wick = rejection of lows = potential price going up (Hammer, Hanging Man).
  • Long upper wick = rejection of highs = potential price going down (Inverted Hammer, Shooting Star).
    But again, the trend direction decides which is valid.

Example Breakdown
Let’s take two pairs of candles that look similar but mean opposite things depending on where they form:
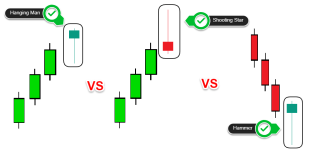
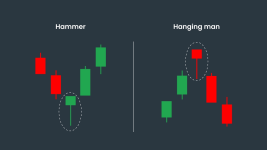
1. Hammer vs Hanging Man
1762249986501.png


  • Both have small body on top, long lower wick.
  • In a downtrend, it’s a Hammer → buyers fighting back → possible reversal up.
  • In an uptrend, it’s a Hanging Man → sellers testing control → possible reversal down.

2. Inverted Hammer vs Shooting Star

  • Both have small body on bottom, long upper wick.
  • In a downtrend, it’s an Inverted Hammer → buyers testing higher prices → potential upward reversal.
  • In an uptrend, it’s a Shooting Star → buyers tried to continue the rally but failed → potential drop.
Same shape, opposite story.

Quick Summary

Candle
Trend Context
Rejection Side
Who’s Gaining Control
What It Signals
HammerAfter downtrendLower pricesBuyersPossible trend reversal up
Inverted HammerAfter downtrendHigher pricesBuyers testing strengthPossible trend reversal up
Shooting StarAfter uptrendHigher pricesSellersPossible trend reversal down
Hanging ManAfter uptrendLower pricesSellers testing strengthPossible trend reversal down


The Golden Rule
👉 Don’t name the candle first — identify the trend first.

Once you know if price is rising or falling, the pattern tells you who’s fighting back.
That’s how you know if you’re looking at a hammer or a hanging man, a shooting star or an inverted hammer.

What it means:
The market opened, buyers pushed price way up, then sellers slammed it back down near the open before the candle closed.
That long upper wick shows rejection of higher prices — a sign that buyers ran out of strength and sellers may be taking control.

So, it’s a warning that an uptrend might be losing steam.

Where it matters:

  • After a clear uptrend, especially near a resistance level
  • On higher timeframes (4H, Daily, Weekly) for more reliability
  • At psychological levels (like 1.2000, 150.00, etc.)

How to confirm it:
  • Wait for the next candle to close below the Shooting Star’s low — that’s your confirmation sellers are in control.
  • Strong confirmation if that next candle is a big bearish one (engulfing or wide-range red candle).

How to trade it:

  • Entry: place a sell stop a few pips below the Shooting Star’s low.
  • Stop loss: a few pips above the high of the wick.
  • Take profit: next support level or at least a 1.5:1 to 2:1 reward-to-risk ratio.

Example:
Price rallies to 1.2150 and prints a Shooting Star with a long wick up to 1.2170 and a close at 1.2145.
→ Sell stop: 1.2140
→ Stop loss: 1.2175
→ TP: 1.2080 (2:1 ratio)


What to avoid:
  • Shooting Stars that form in sideways markets (they’re meaningless there).
  • Taking trades before confirmation — wait for sellers to actually appear.


Hanging Man

What it looks like:
Almost identical to a Hammer (small body on top, long lower wick),
but the key difference is location:
  • It forms after an uptrend, not a downtrend.
What it means:
During the candle, sellers pushed price down hard (creating that long lower wick),
but buyers pulled it back near the open before closing.
That might sound bullish — but in an uptrend, it shows that sellers are starting to fight back.
It’s a warning that the rally could be ending soon.

Where it matters:
  • At the top of an uptrend or near a strong resistance level.
  • More powerful when followed by a bearish confirmation candle.

How to confirm it:
  • Wait for the next candle to close below the Hanging Man’s low — that tells you sellers actually took over.
  • Ideally, the next candle should be big and red with higher volume.

How to trade it:
  • Entry: sell stop below the Hanging Man’s low.
  • Stop loss: just above the high of the Hanging Man.
  • Take profit: aim for the nearest support or use at least a 1.5:1 reward ratio.

Example:
Uptrend reaches 150.50 on USD/JPY. Hanging Man forms — high 150.70, low 150.20, close 150.55.
→ Sell stop: 150.15
→ Stop loss: 150.75
→ TP: 149.50 or lower.

The Core Idea (For Both)

Think of these as rejection candles:
  • Shooting Star: rejection of higher prices (potential top)
  • Hanging Man: warning that buyers are tiring and sellers are testing the ground

Confirmation is everything.
A single candle means nothing if the next candle doesn’t agree.
That’s why pro traders always wait for follow-through — one candle is the “story,” the next is the “proof.”


Quick Checklist Before You Trade​

  • Is there a clear uptrend before it formed?
  • Is it near resistance or a psychological round number?
  • Did the next candle confirm with a bearish close?
  • Is the risk/reward ratio at least 1.5:1?
  • Is your position size small enough that you can handle a loss calmly?

3. Engulfing Candle

1762247658543.png
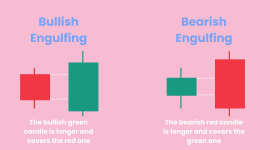
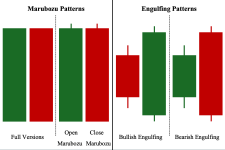
An Engulfing Candle
is when one candle completely “swallows” the body of the previous one.
That means one side (buyers or sellers) just overpowered the other in a single move.

It shows a sudden shift in control:
  • Bullish Engulfing → buyers took control after a fall
  • Bearish Engulfing → sellers took control after a rise
That’s the essence — a power flip.


Bullish Engulfing (Predicting Price Will Go Up)
What it looks like:

  • First candle is bearish (red).
  • Next candle is bullish (green).
  • The green candle’s body completely covers or engulfs the red one.
What it means:
Sellers pushed the price down, but then buyers came in strong, not only reversing that drop but closing above the previous open.
It’s like buyers saying, “We’ve had enough — we’re taking over.”

How to predict price direction:

  • If it forms after a downtrend or at a support level, it signals a likely reversal upward.
  • If the next candle also closes higher, that confirms the move — price is likely to continue rising.
Example setup:
  1. Market has been falling for several candles.
  2. You see a small red candle, followed by a large green candle that engulfs it.
  3. The green candle closes near its high.
  4. The next candle starts pushing higher — confirmation.
    → Expect an upward trend.


Bearish Engulfing (Predicting Price Will Go Down)
What it looks like:

  • First candle is bullish (green).
  • Next candle is bearish (red).
  • The red candle’s body completely covers the green one.

What it means:
Buyers pushed the price up, but sellers suddenly came in with more strength and forced it all the way back down, closing below the previous open.
This shows a shift from buyer control to seller control.

How to predict price direction:
  • If it forms after an uptrend or at a resistance level, it signals a likely reversal downward.
  • If the next candle also closes lower, that confirms the bearish reversal.
Example setup:
  • Market has been rising.
  • You spot a small green candle followed by a large red one that covers it.
  • The red candle closes near its low.
  • The next candle opens and moves further down — confirmation.
    → Expect a downward trend.


Key Things That Make an Engulfing Pattern Strong​

  1. Location matters more than the pattern itself.
    • At support: bullish engulfing means buyers are defending the level.
    • At resistance: bearish engulfing means sellers are defending the level.
  2. The bigger the engulfing candle, the stronger the signal.
    • A full-body engulfing with little to no wick shows strong momentum.
  3. Volume spikes add confidence.
    • Higher volume on the engulfing candle confirms strong participation.
  4. The trend before it matters.
    • A bullish engulfing in a strong downtrend = potential reversal.
    • A bearish engulfing in a strong uptrend = potential top.
  5. Confirmation is key.
    • Wait for the next candle to close in the same direction before entering a trade.


How to Trade Engulfing Candles​

For Bullish Engulfing:
  1. Wait for a bullish engulfing at support or after a downtrend.
  2. Once the candle closes, wait for the next one to confirm by moving higher.
  3. Entry: Above the high of the engulfing candle.
  4. Stop Loss (SL): Below the low of the engulfing candle.
  5. Take Profit (TP): At the next resistance level, or 2–3 times your risk.

For Bearish Engulfing:
  1. Wait for a bearish engulfing at resistance or after an uptrend.
  2. Wait for confirmation with a lower close.
  3. Entry: Below the low of the engulfing candle.
  4. Stop Loss (SL): Above the high of the engulfing candle.
  5. Take Profit (TP): At the next support level, or 2–3 times your risk.


Mistakes Beginners Make​

  • Trading engulfing candles in the middle of nowhere — context matters.
  • Entering before the candle closes — many fake engulfings form mid-candle.
  • Ignoring trend direction — don’t take a bearish engulfing in a strong uptrend unless it’s near resistance.
  • Forgetting to set a stop loss — even perfect engulfings can fail.


Pro Tip​

Use higher timeframes (1H, 4H, Daily) when learning.
On smaller timeframes (1m, 5m), engulfings happen constantly and most are noise.
On higher timeframes, each engulfing candle represents stronger intent and gives more reliable signals.


4. Morning Star / Evening Star

1762248430958.png

Morning Star (Bullish Reversal Pattern)

What It Is

The Morning Star forms at the bottom of a downtrend and signals that the market may be about to move up. It’s a three-candle pattern that shows sellers losing control and buyers stepping in with strength.

Structure of a Morning Star

1762248616657.png
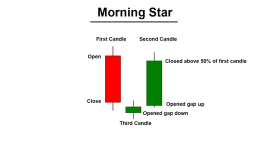
  1. First Candle – Bearish:
    • Large red candle showing strong selling pressure.
    • Confirms that the market is still in a downtrend.
  2. Second Candle – Small / Indecision (Doji or Small Body):
    • This candle shows hesitation.
    • The market stops falling sharply, and both buyers and sellers seem uncertain.
    • This is the “pause” before the reversal.
  3. Third Candle – Bullish:
    • A large green candle that closes well above the midpoint of the first candle.
    • This confirms that buyers have taken control.


What It Means​

The Morning Star shows a shift in sentiment:
  • First, sellers dominate (big red candle).
  • Then, the market stalls (small candle).
  • Finally, buyers take over (big green candle).
It’s called “Morning Star” because it marks the beginning of a new “day” — a new uptrend.


How to Predict the Move​

  • If the third candle closes above the midpoint of the first candle → strong bullish signal.
  • The pattern is stronger if it forms at a major support level or after a long downtrend.
  • Confirmation comes when the next candle also closes higher — then you can expect upward continuation.

How to Trade It​

  1. Wait for all three candles to form.
  2. Confirm that the third candle closes above the midpoint of the first one.
  3. Enter Buy: above the high of the third candle.
  4. Stop Loss: below the low of the second (middle) candle.
  5. Take Profit: near the next resistance area or 2–3 times your stop distance.


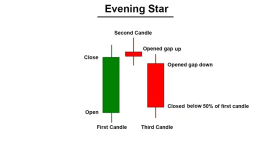
Evening Star (Bearish Reversal Pattern)

1762248747287.png

What It Is

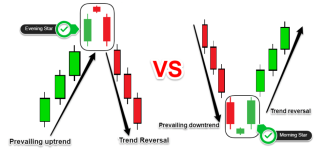
The Evening Star is the opposite it forms at the top of an uptrend and signals that the market may move down. It also has three candles that tell a story of momentum fading and reversing.

Structure of an Evening Star​

  1. First Candle – Bullish:
    • Strong green candle showing clear buying momentum.
  2. Second Candle – Small / Indecision:
    • Could be a small-bodied candle or a Doji.
    • Shows that buyers are losing steam, and the market is pausing.
  3. Third Candle – Bearish:
    • Large red candle that closes below the midpoint of the first candle.
    • Confirms sellers have taken control.


What It Means

This pattern shows that buyers were in charge, but they’ve hit resistance.
The small second candle shows uncertainty, and the third candle shows sellers coming in hard to reverse the trend.

The name “Evening Star” fits — it marks the end of the “day” or the start of night (a downtrend).
How to Predict the Move

  • When the third candle closes below the midpoint of the first one → strong bearish signal.
  • If it forms at a resistance zone or after a strong rally, expect a downward reversal.
  • Confirmation comes when the next candle also closes lower.

How to Trade It
  1. Wait for the full three-candle pattern.
  2. Confirm that the third candle closes below the midpoint of the first one.
  3. Enter Sell: below the low of the third candle.
  4. Stop Loss: above the high of the second (middle) candle.
  5. Take Profit: near the next support level or 2–3 times your stop distance.


Key Differences Between Morning Star and Evening Star

Feature
Morning Star
Evening Star
Market ContextForms at the bottom of a downtrendForms at the top of an uptrend
Direction PredictionPrice likely to risePrice likely to fall
Candle SequenceRed → Small → GreenGreen → Small → Red
MessageSellers lose control, buyers take overBuyers lose control, sellers take over


What Makes These Patterns Reliable
  1. Clear Trend Before Pattern:
    The pattern must appear after a clear trend — not in a sideways market.
  2. Strong Third Candle:
    The bigger the third candle, the stronger the signal. It shows real conviction.
  3. Location Matters:
    Morning Star near support = stronger reversal.
    Evening Star near resistance = stronger reversal.
  4. Volume Confirmation:
    If volume spikes on the third candle, that adds weight to the reversal signal.


Quick Visual Summary
Morning Star:

📉 → pause → 📈
(Downtrend → indecision → reversal upward)
Evening Star:
📈 → pause → 📉
(Uptrend → indecision → reversal downward)
 

B. Continuation Candles — When Trend is Strong​

1. Marubozu​

What Is a Marubozu?

1762366441500.png
A Marubozu (Japanese for “bald” or “shaven”) is a powerful single candlestick with no shadows (wicks) — meaning the open equals the high and the close equals the low (or vice versa). It has a long, solid body and zero upper or lower wick, showing that price moved in one direction without hesitation or retracement during the entire period.

  • Bullish Marubozu: Opens at the low, closes at the high → full green/red (depending on platform) body.
  • Bearish Marubozu: Opens at the high, closes at the low → full red body.

Market Psychology Behind It​

Here’s what’s happening under the hood:

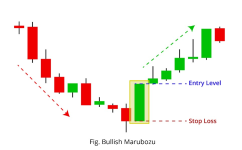
Bullish Marubozu (Full Green Candle)

1762366588490.png
  • Buyers took control right from the open.
  • There was no hesitation, no significant pullback, no seller fightback.
  • The price climbed steadily and closed at the very top of the range.
    Psychology: Confidence, aggression, and strong demand.
    Interpretation: Bulls are in full control. Any pullback after this candle often attracts more buyers.

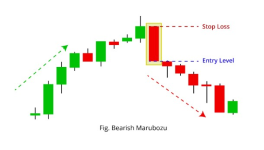
Bearish Marubozu (Full Red Candle)

1762367056452.png
  • Sellers dominated from the first tick.
  • No pushback from buyers. Price kept falling all session and closed at the low.
  • Shows panic, fear, or heavy selling pressure.
    Psychology: Weakness, fear, and strong supply.
    Interpretation: Bears are controlling the market. Even if the price bounces slightly, it’s often temporary unless buyers prove otherwise.

There’s no hesitation — buyers or sellers had control from start to finish.
  • In a bullish Marubozu, buyers dominated every tick; not once did sellers push the price down.
  • In a bearish Marubozu, the opposite: total seller control.

How to Identify It on a Chart​

To spot a Marubozu:
  1. Look for a long candle (relative to recent ones).
  2. No visible wicks — or if present, they’re tiny compared to the body.
  3. Appears after a trend continuation or at breakout points.

Examples:
  • In an uptrend, a bullish Marubozu confirms buyers are still pushing.
  • In a downtrend, a bearish Marubozu confirms sellers haven’t let up.
  • Near support/resistance, it can signal a breakout if it closes beyond that level with strong body dominance.

Predicting Price Movement Using It​

In an Uptrend (Bullish Marubozu)

  • Confirms the continuation of the uptrend.
  • Often follows a consolidation or small pullback.
  • Traders may enter long on the next candle’s minor retracement or on a break of the Marubozu’s high.
  • Stop loss usually goes below the candle’s midpoint or previous support.

In a Downtrend (Bearish Marubozu)

  • Confirms the continuation of the downtrend.
  • Appears after small bullish corrections or sideways pauses.
  • Traders can enter short on a retest of the Marubozu’s midpoint or on a break of its low.
  • Stop loss typically set above the midpoint or recent resistance.

Example Scenario​

Imagine EUR/USD has been climbing slowly for a few hours, forming small candles. Then suddenly you see a large bullish Marubozu with almost no wicks.
→ That means buyers have regained full control.
→ Price will likely continue upward, at least until it meets the next resistance or shows exhaustion.

Flip the situation if you see a bearish Marubozu after several small consolidating candles, it’s often the start (or continuation) of a strong sell-off.


Key Trading Tips​

  • Don’t trade a lone Marubozu blindly confirm with volume or structure (like a breakout level or a moving average trend).
  • A Marubozu near key support/resistance is more meaningful than one floating mid-range.
  • Combine with tools like RSI or MACD for momentum confirmation.
  • When volume spikes with a Marubozu, it’s usually institutional money moving strong continuation signal.

Signal: Strong continuation in the direction of the candle.


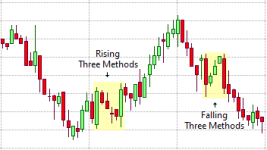
2. Rising / Falling Three Methods
1762368034137.png
The Three Methods pattern is a continuation formation, not a reversal. Think of it as the market breathing in before exhaling again in the same direction.

It usually forms in a strong existing trend — bullish or bearish — and tells you that the dominant side is just taking a short break while weak hands or short-term traders take profit.


There are two versions:
  • Rising Three Methods – appears in an uptrend.
  • Falling Three Methods – appears in a downtrend.


Structure Breakdown​

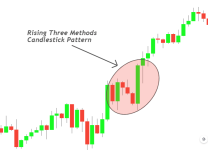
Rising Three Methods (Bullish Continuation)

1762368633727.png
Sequence:
  1. Big Green Candle: Strong bullish momentum. Sets the tone and defines the range.
  2. 2–4 Small Red Candles: Minor pullback or consolidation. Each of these small candles stays within the high and low of the first big green one. No breakdown — just a pause.
  3. Another Big Green Candle: Closes above the high of the first candle, confirming bulls are back in full control.

What this shows visually: a big push, a calm cluster in the middle, then another push — like a wave gathering strength again.


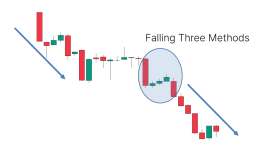
Falling Three Methods (Bearish Continuation)

1762368875938.png
Sequence:
  1. Big Red Candle: Strong selling wave.
  2. 2–4 Small Green Candles: Short-term buyers try to lift price, but can’t push above the first candle’s high. The move stalls within that zone.
  3. Another Big Red Candle: Closes below the low of the first candle — sellers resume the downtrend.
It’s the mirror image of the Rising version — the market inhaling before another drop.

Market Psychology — What’s Really Happening​

During Rising Three Methods:

  • The first strong bullish candle attracts traders and triggers FOMO entries.
  • After that surge, some bulls take profit, and counter-traders (bears) step in for short-term plays.
  • But here’s the key: bears can’t break below the range of the first candle. Buyers are quietly absorbing every dip.
  • Then, the final green candle blasts through the top — signaling that buyers never lost control.

Psychology summary:
Bulls paused, not retreated. The market “rested” without changing direction. Smart money was still in charge.

During Falling Three Methods:

  • The first big red candle shows panic or solid selling pressure.
  • The small green candles that follow represent short covering or weak dip buyers testing the waters.
  • Sellers stay patient — no panic to close positions.
  • When the final red candle takes out the low, it’s confirmation that the bearish crowd remains dominant.

Psychology summary:
Sellers allowed a brief correction to trap eager buyers, then crushed them again on the continuation wave.


How to Identify It Clearly on Charts​

Look for:
  • A strong directional candle followed by 3–5 small candles that move counter-trend.
  • Those small candles must remain inside the range (high and low) of the first large one.
  • The final candle must break out beyond the range of the first.
  • Bonus confirmation: Volume should dip during the small consolidation and spike on the breakout.
If the middle candles are too many (like 7+), or they break out of the first candle’s range, it’s not a proper Three Methods pattern — it’s just a random pullback.


Trading the Pattern​

How to Trade — Step-by-Step​

A. Rising Three Methods (Bullish Setup)

1. Entry

Wait for the final breakout candle to close above the high of the first big candle.

Two ways to enter:
  • Aggressive: Enter as soon as the breakout candle closes above that high.
  • Conservative: Wait for a minor pullback or retest of the breakout level (price revisiting the broken zone).
This small retest often happens because short-term traders take profits right after the breakout.

2. Stop Loss

You have two clean options:
  • Tight stop: Below the lowest point of the small pullback candles.
  • Safe stop: Below the first big bullish candle’s low — gives more breathing room but reduces position size.

3. Take Profit

Use the Risk/Reward ratio to plan your exit:
  • Target 1.5× to 2× the distance you risked.
    Example: if your stop is 50 pips, aim for 75–100 pips profit.
  • Alternatively, you can trail your stop — move it up as price forms higher lows or crosses key moving averages (like the 20 EMA).


B. Falling Three Methods (Bearish Setup)

1. Entry

Wait for the final breakout candle to close below the low of the first big bearish candle.

Entry choices:
  • Aggressive: Enter short right after the candle closes below that low.
  • Conservative: Wait for a retest of that broken support level before entering short.

2. Stop Loss

Two clean spots:
  • Tight stop: Above the highest point of the small pullback cluster.
  • Safe stop: Above the first big red candle’s high.

3. Take Profit

Same principle — aim for 1.5× to 2× risk/reward, or trail the stop above new lower highs as the trend continues.


Pro Tips and Filters​


✅ Volume Confirmation
This is one of the strongest filters for this setup.
  • During the small candles (the pause), volume should be low — showing lack of conviction from the counter-side.
  • On the breakout candle, volume should spike up — confirming strong participation from the trend-following side.

If you see the opposite (rising volume during the small candles), it may mean the counter-move has real strength — a potential early reversal.

✅ Trend Context Matters
Always check if the broader market structure supports your trade:
  • For Rising Three → higher highs, higher lows.
  • For Falling Three → lower highs, lower lows.
✅ Avoid Sideways Markets
This pattern loses meaning when there’s no strong directional bias.

✅ Combine With Indicators
Use RSI, MACD, or EMAs to confirm continuation momentum.
Example: If RSI stays above 50 in a bullish setup or below 50 in a bearish setup, the continuation is likely genuine.


The Logic Behind the Risk/Reward Formula​

The 1.5×–2× risk-to-reward ratio ensures that even if you’re only right half the time, you’ll still be profitable over time.
Let’s say:
  • You risk 50 pips per trade.
  • You win 50% of your trades.
  • You target 100 pips (2× risk).
Out of 10 trades:
  • 5 losses = -250 pips
  • 5 wins = +500 pips
    Net +250 pips, even with only 50% accuracy.

That’s why the formula matters — it turns discipline into profitability.


Practical Example​

Imagine GBP/USD is in a clear uptrend. You spot:
  • 1 large bullish candle.
  • 3 small bearish candles within its range.
  • Then a new large bullish candle that closes above the first candle’s high, with rising volume.
✅ Entry: After breakout close (or small retest).
✅ Stop: Below the lowest small candle.
✅ Target: 1.5–2× your stop size, or trail until price shows exhaustion.

You’re essentially joining the trend after a controlled pause, not chasing the move blindly.


C. Indecision Candles — When the Market is Waiting
Indecision candles
are the moments when the market takes a breath. Neither buyers nor sellers are sure what to do next, so the price just wobbles around instead of making a clear move.

You’ll often see them before big breakouts or reversals — it’s like the calm before the storm.

These candles don’t give you direction by themselves. They’re signals to pay attention to what’s about to happen next.

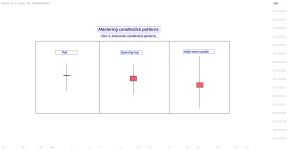
Now let’s break down the two main types you’ll see: Doji and Spinning Top.
1762370959714.png


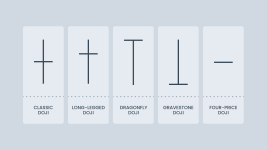
1. Doji — Perfect Balance Between Buyers and Sellers
What It Looks Like
1762371817225.png


A Doji forms when the open and close prices are almost the same.
That means buyers pushed the price up, sellers pushed it down, but in the end — nobody won.

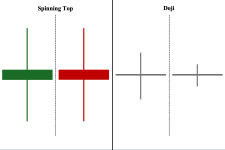
Visually, it’s a thin cross or plus sign (+). Sometimes it has long wicks, sometimes short, depending on how far price moved before returning to balance.
1762371198452.png
What It Means

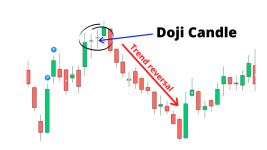
A Doji says: “The market is uncertain right now.”
It often appears at key turning points, like after a strong rally or a big drop.
It’s not a reversal by itself — it’s a warning that momentum might be slowing.

Think of it as the market pausing to decide:
  • “Should we keep going up?” or
  • “Is it time to turn around?”
EXTRA CHART
1762373597439.png


How to Trade It
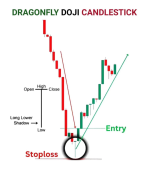
Don’t jump in just because you see a Doji. Wait for confirmation — the next candle tells the real story.

Here’s how:
  1. Bullish Breakout (upward continuation)
    • Wait for a strong bullish candle to close above the Doji’s high.
    • That confirms buyers have taken control.
    • Entry: At the close of that bullish candle or on a minor pullback.
    • Stop Loss: Below the Doji’s low.
    • Take Profit: Use a 1.5–2x risk/reward ratio or place it near the next resistance zone.
  2. Bearish Breakout (downward continuation)
    • Wait for a strong bearish candle to close below the Doji’s low.
    • That confirms sellers have taken over.
    • Entry: At the close of that bearish candle or on a retest of the breakout level.
    • Stop Loss: Above the Doji’s high.
    • Take Profit: 1.5–2x risk/reward or next major support zone.
💡 Pro Tip:
If a Doji appears after a long strong trend, it’s a sign that trend might be running out of steam. If it shows up in a sideways market, it’s usually just noise — wait for volume and a breakout candle to confirm.


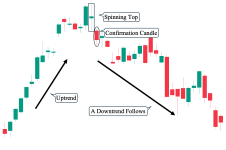
Spinning Top — Active but Confused Market

1762375153433.png
What It Looks Like
1762375360887.png
A Spinning Top has a small real body and long wicks both above and below.
The color (red or green) doesn’t matter much — the key idea is that price moved a lot in both directions but ended close to where it started.

What It Means

The Spinning Top tells you the market was busy but indecisive.
Buyers tried to push higher, sellers fought back, and by the end of the session, there was no clear winner.

This usually happens during consolidation, when price is stuck between support and resistance.
It can also appear near reversal zones, hinting that sentiment is shifting.

How to Trade It
You trade it almost like a Doji — you wait for confirmation.
Here’s how:
  1. Bullish Setup:
    • Wait for a strong bullish candle that closes above the Spinning Top’s high.
    • Entry: On the close or minor pullback.
    • Stop Loss: Below the Spinning Top’s low.
    • Take Profit: 1.5–2x risk/reward or next resistance.
  2. Bearish Setup:
    • Wait for a strong bearish candle that closes below the Spinning Top’s low.
    • Entry: On the close or retest.
    • Stop Loss: Above the Spinning Top’s high.
    • Take Profit: 1.5–2x risk/reward or next support.
💡 Extra Tip:
If you see a series of Spinning Tops forming together, it means the market is compressing — energy is building up. When the breakout happens (big candle with high volume), it often moves fast and hard.


Combining Indecision Candles with Context
To get the most out of Dojis and Spinning Tops, combine them with:
  • Trend direction: In an uptrend, bullish confirmations work better. In a downtrend, bearish confirmations are stronger.
  • Support and Resistance: If a Doji appears right at a resistance level, that’s a potential reversal warning.
  • Volume: Low volume = weak signal. High volume after the Doji = strong confirmation.

4. The Formula Behind Your Risk/Reward (1.5x–2x)
Let’s say your:
  • Entry = 1.2000
  • Stop loss = 1.1980 (20 pips)
If you use a 1.5x risk/reward ratio, your target is 20 pips × 1.5 = 30 pips profit.
So, your take profit = 1.2030.

This formula helps you maintain consistent, disciplined trades. You risk a little to gain more — that’s how you stay profitable even if not every trade wins.

Bottom Line
Indecision candles are not “buy” or “sell” signals — they’re warning lights.
They tell you the market is unsure, which means something big could be around the corner.

The smart move is to wait for the market to show its hand — when the next strong candle confirms direction, that’s your opportunity.
 
Status
Not open for further replies.
Back
Top Bottom